
SolarEdge + Home Assistant Hack Puts Battery Owner In Control


This is the story of Mathias Boer-Mah, a self-confessed tinkerer, energy nerd and SolarEdge Home Battery owner. Mathias wanted more control of his battery than SolarEdge could provide, so he hooked up his SolarEdge inverter to a free open-source software application for home automation. Through this, he can now:
- control the battery charge/ discharge
- automatically curtail his solar
- import and export electricity according to spot prices and forecasts from his electricity retailer Amber
- turn on and off high-energy devices in his house automatically to use surplus solar energy.
Pretty impressive stuff for a DIY solution.
Before we go any further, a round of applause for Mathias, please.

Mathias first came to SolarQuotes’ attention when he posted a comment on a review of the SolarEdge Home Battery by SQ blogger Ronald in September this year.
Both the SolarEdge Home Battery and the Energy Hub inverter can be controlled by the mySolarEdge mobile app. However, more than a handful of owners and potential buyers have commented about one aspect of the app that leaves much to be desired – the lack of customer access to some basic functionality.
For example, as in most home battery systems, the level of reserved energy can be set in case of a blackout. With the SolarEdge Home Battery, you must contact the installer to change the setting. This is SolarEdge putting the installer before the end consumer. Not good.
Mathias says contrary to popular belief, the mySolarEdge app can actually do this without having to contact the installer1. It’s just a bit harder for the average battery owner to interrogate the inverter. He, however, has gone a different route.
Mathias’ Home Assistant Journey
Mathias had been using ‘Home Assistant‘ for about six years, doing things such as automating his lights to switch on when he gets home, and switch off when he leaves. He already knew it would be possible to integrate a SolarEdge inverter with Home Assistant, so when he bought his home battery, he gave it a try.
It took some time to get SolarEdge and Home Assistant to talk because it’s not plug-and-play, but worth the effort he says:
“because the functionality is amazing, and so much better than the mySolarEdge app. It’s chalk and cheese really.”
As you can guess, Mathias works in IT, so he is familiar with this stuff. He has previously been leading an applications support team doing, among other things, low code programming that he describes as “drag and drop stuff; similar to the way Home Assistant works.”
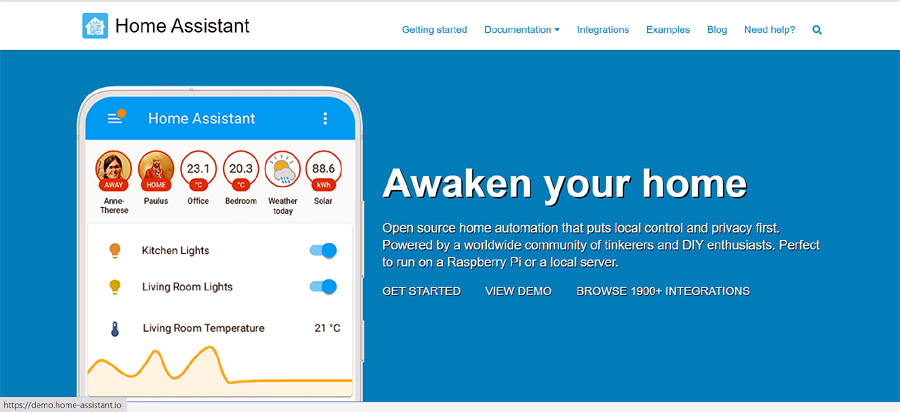
Home Assistant webpage. Image: Home Assistant
What About The Average Joe?
So, is this something the average Joe can set up, or do you need programming or coding experience? I suspect it would help, although Mathias is a bit more optimistic.
“You don’t necessarily need programming or coding experience to do what I’ve done. All the tools in Home Assistant are pre-made tools to interrogate SolarEdge. Someone else has already made them because it’s free open-source software, which is being developed constantly by a community of software developers.”
“Home Assistant is the second most active Python project on GitHub. There are thousands of people using it, and they’re not all programmers. The fact that it has a lot of inbuilt automation that can pick up your smart appliances without any coding necessary, allows anyone to get into it, and build as they go.”
This Is How You Do It
Mathias says, “it’s not that complicated”. I don’t believe him. To me, Mathais is a God. I’ll attempt to explain.
Plug It In
The first rule of troubleshooting is “Is it plugged in?” followed closely by “Is it turned on?” So that seems like an appropriate place to start.
Mathias has his Home Assistant installed on a dedicated small form factor HP desktop computer. It runs 24/7 and is pretty efficient. He used to run it on a Raspberry Pi, which is far more efficient but prone to crashing.
“When the computer goes down, so too does the approval rating with my girlfriend.”
In this case, it seems that a stable computer equals a stable relationship. Moving on.
The Home Assistant PC is connected via an Ethernet cable to a router and then either by WiFi or Ethernet to the inverter and smart devices. Other smart appliances connect wirelessly via the Zigbee USB dongle in the computer.
SolarEdge initially had Modbus over Wifi. Modbus is the communication protocol that talks to the inverter. Then they blocked it, so you had to go through Ethernet. Now they’ve unblocked it, so you can use WiFi again. Mathias has kept his Ethernet connection because it’s more stable, and as we know, stability is important for Mathias.
Side note – To use WiFi, you need to set it up on the inverter.
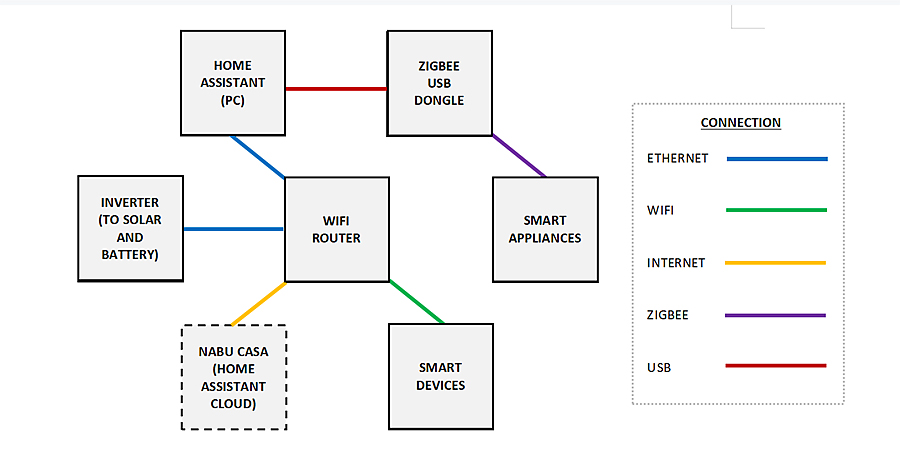
Mathias’ LAN connection diagram. Image: SolarQuotes
Turn It On
Home Assistant is the base system. It’s very smart, and once installed will pick up most of the smart devices in your house automatically – things such as smart lights, electric toothbrushes, etc. It even tells you how long you cleaned your teeth and how much pressure you used. Very useful stuff.
From there, you can access a bunch of plugins and start building. For example, you could install the SolarEdge communication tool, which will access information from the inverter. Mathias says he only uses a small fraction of it – if the battery is charging, what percentage it is, etc.
He says:
“It has tons of other stuff like the electrical waves and stuff I don’t understand.” (Oh no, maybe he’s not a God after all.) “After that, you just create automations using low code plugins which create triggers such as time of day, battery charge, export blocking when prices are negative, etc.”
Home Assistant Automation Overview
Although the automations may look complicated, they are built piece by piece with three simple stages called Triggers, Conditions, and Actions. Start by creating an automation either from scratch by using an empty automation, or using a blueprint from a drop-down menu, which is something that another user has pre-built. From there, you start creating relevant Triggers, Conditions, and Actions.
You might, for example, select Trigger Device, and create a trigger for when the pool solar pump is turned on or off. The resulting action in this mock example below is to play some music from the media player.
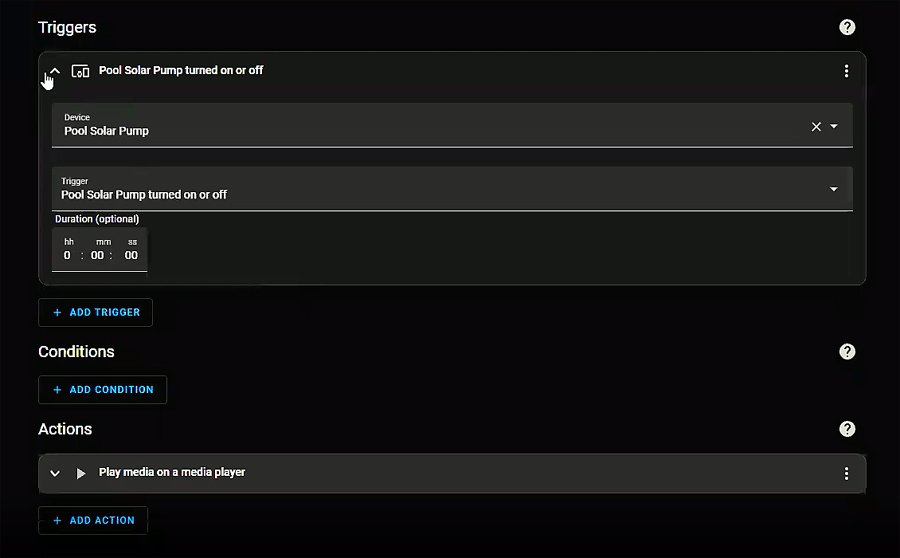
Mock example of pool solar pump triggers and actions. Image: Mathias Boer-Mah
The diagram below shows some Triggers, Conditions, and Actions Mathias has set up for his battery to respond to based on import/ export electricity price and excess solar.
Example 1
If the electricity import price is above 60c/kWh (Trigger), and the battery level is above 20% (Condition), turn off all air conditioners and pool pump (Action).
Example 2
If the electricity import price is less than 0c/kWh (Trigger), and the battery level is less than 100% (Condition), charge the battery from the grid (Action).
Example 3
If the electricity export price is greater than $10/kWh (Trigger), and the battery level is greater than 20% (Condition), export the battery to the grid (Action).
Example 4
If the excess solar power is more than 1200W (Trigger), and house temperature is less than 17 degrees (Condition), turn on AC1 to heat (Action).
Example 5
If the excess solar power is more than 1200W (Trigger), and house temperature is above 26 degrees (Condition), turn on AC1 to cool (Action).
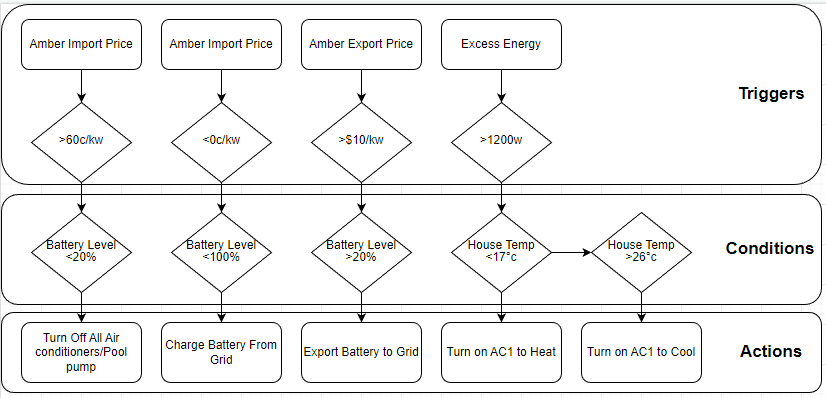
Home Assistant Triggers, Conditions, Actions custom flowchart. Image: Mathias Boer-Mah
Export Limiting With SolarEdge And Home Assistant
Mathias showed me a dashboard he set up on Home Assistant to monitor everything. At the time, his solar power system was producing 1.6 kW, which was the same as his home was simultaneously consuming. The reason was that he’d triggered export limitation.
To find out how much power was being curtailed due to the export limit, he had set up another action disabling the export limit for five seconds, recording the exported power, and then re-enabling the export limit. This showed how much power was being curtailed at that time. His custom-made live dashboard showed 2.714kW of curtailed power at that time.
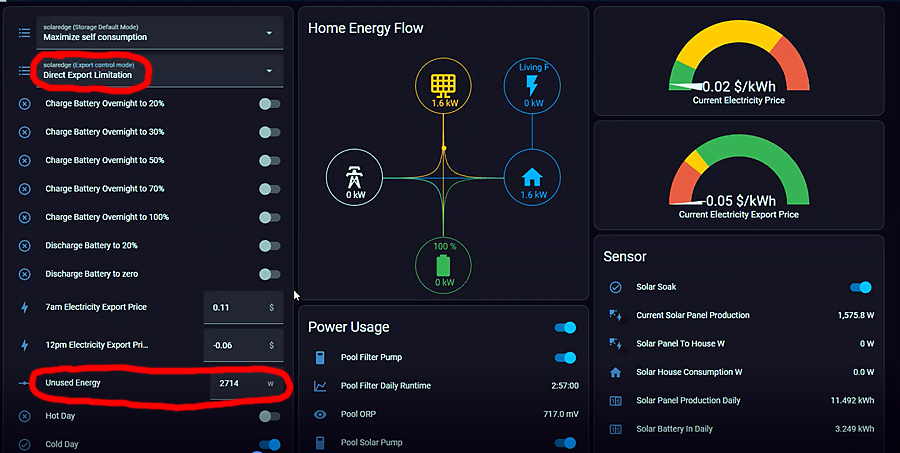
Home Assistant custom dashboard showing unused solar power during export limiting. Image: Mathias Boer-Mah
Mathias plans to use more of his excess solar energy by installing a heat pump hot water system and replacing the gas stove with an induction cooktop. He has already started the process of streamlining his power use, by automating the air conditioner.
For example, in winter, if the house is cold when the sun is out, and the solar panels are producing excess power, all the air conditioners are turned on to absorb the energy and heat the house.
It started as an experiment to see if the house could absorb the heat during the day, and then later release that heat and so eliminate the need to run the air conditioner during peak periods.
And yes, Mathias says it works quite well.
Energy Savings
I asked Mathias, “So this whole set-up, apart from being an obsession and a lot of nerdy fun, has it actually saved or made you money?”
“Yes. I’ll show you the progression of bills I’ve got from Amber. The Amber web app shows your everyday usage but doesn’t show the true bill amount. It doesn’t take into account the $15/ month charge plus poles and wires, which is about $1/ day.”
So naturally, Mathias has put the extra charges into Home Assistant so he can monitor his true expenses and know exactly what his next power bill will likely be.
See the bills below; starting low on April 22 and then getting quite high in May due to heating costs. The solar/ battery system was installed at the end of June and the bills started going down from there. The 10 kWh battery is charged from 11.5 kW of solar panels.
“I had a great month of -$45 in August. Since then have had fairly minor bills but still using the credit from August so no bill yet!”
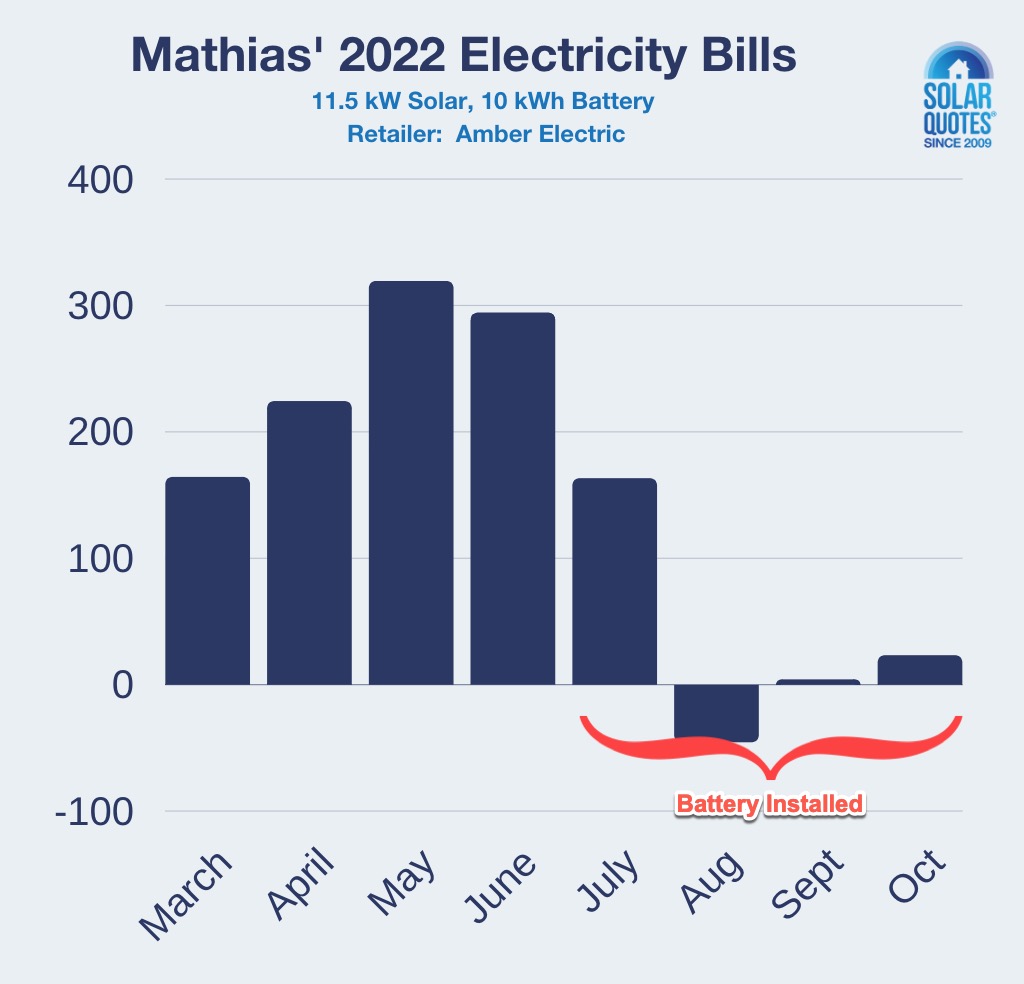
Mathias’ electricity bills. March – Oct 2022: $164, $224, $319, $294 | Battery Installed | $163, $-45, $4, $23
I asked Mathias, “Does your Home Assistant set-up do more than Amber Smartshift VPP offers in their plan, or is it the same thing, just replicated?”
“It is and it isn’t. The reason I haven’t gone with Amber Smartshift is that it isn’t holistic enough for me. They will charge your battery when the price is negative, and they will export from your battery when the export price is high, but not the rest.”
He says Amber Smartshift is revolutionary. It’s OK for a normal person who isn’t obsessed like him.
It’s Not All About The Money
“My methodology behind the power management is not only financially based but also environmentally based. I want to decrease my energy footprint and reduce carbon emissions. Also, there is an excess of solar energy produced by my array, so would like to convert the existing gas appliances to electricity and soak up the excess energy.”
Mathias’ Future Aspirations
Mathias plans to:
- replace the gas stovetop and water heater with an induction stovetop
- heat pump water heater,
- completely disconnect the gas.
- add a pool heat pump to absorb excess energy.
- replace all windows with energy-efficient double glazing.
- buy an EV when the prices come down and V2G (Vehicle to Grid) technology is more widespread.
Tech Specs: Mathias’ Solar, Battery And Automation System
Solar/ Battery:
Automated Devices:
- SolarEdge Inverter
- Solar Edge Battery
- Pool Pump
- Pool Solar Pump
- 3 x Samsung Windfree Air Conditioners
- Assortment of LIFX bulbs, IKEA Tradfri bulbs, switches, and SONOFF Plugs
Hardware:
- HP desktop computer
- WiFi router
- Zigbee USB dongle
Software:
Home Assistant Energy Management Dashboards:
- Energy Distribution
- Solar Production
- Energy Usage
- Custom Home Energy Flow
The statistics are collected every 5 seconds from the inverter through Modbus.
Available Controls For SolarEdge:
- Export Limiting
- Charge Battery from Grid
- Charge Battery from Solar
- Export Battery to Grid
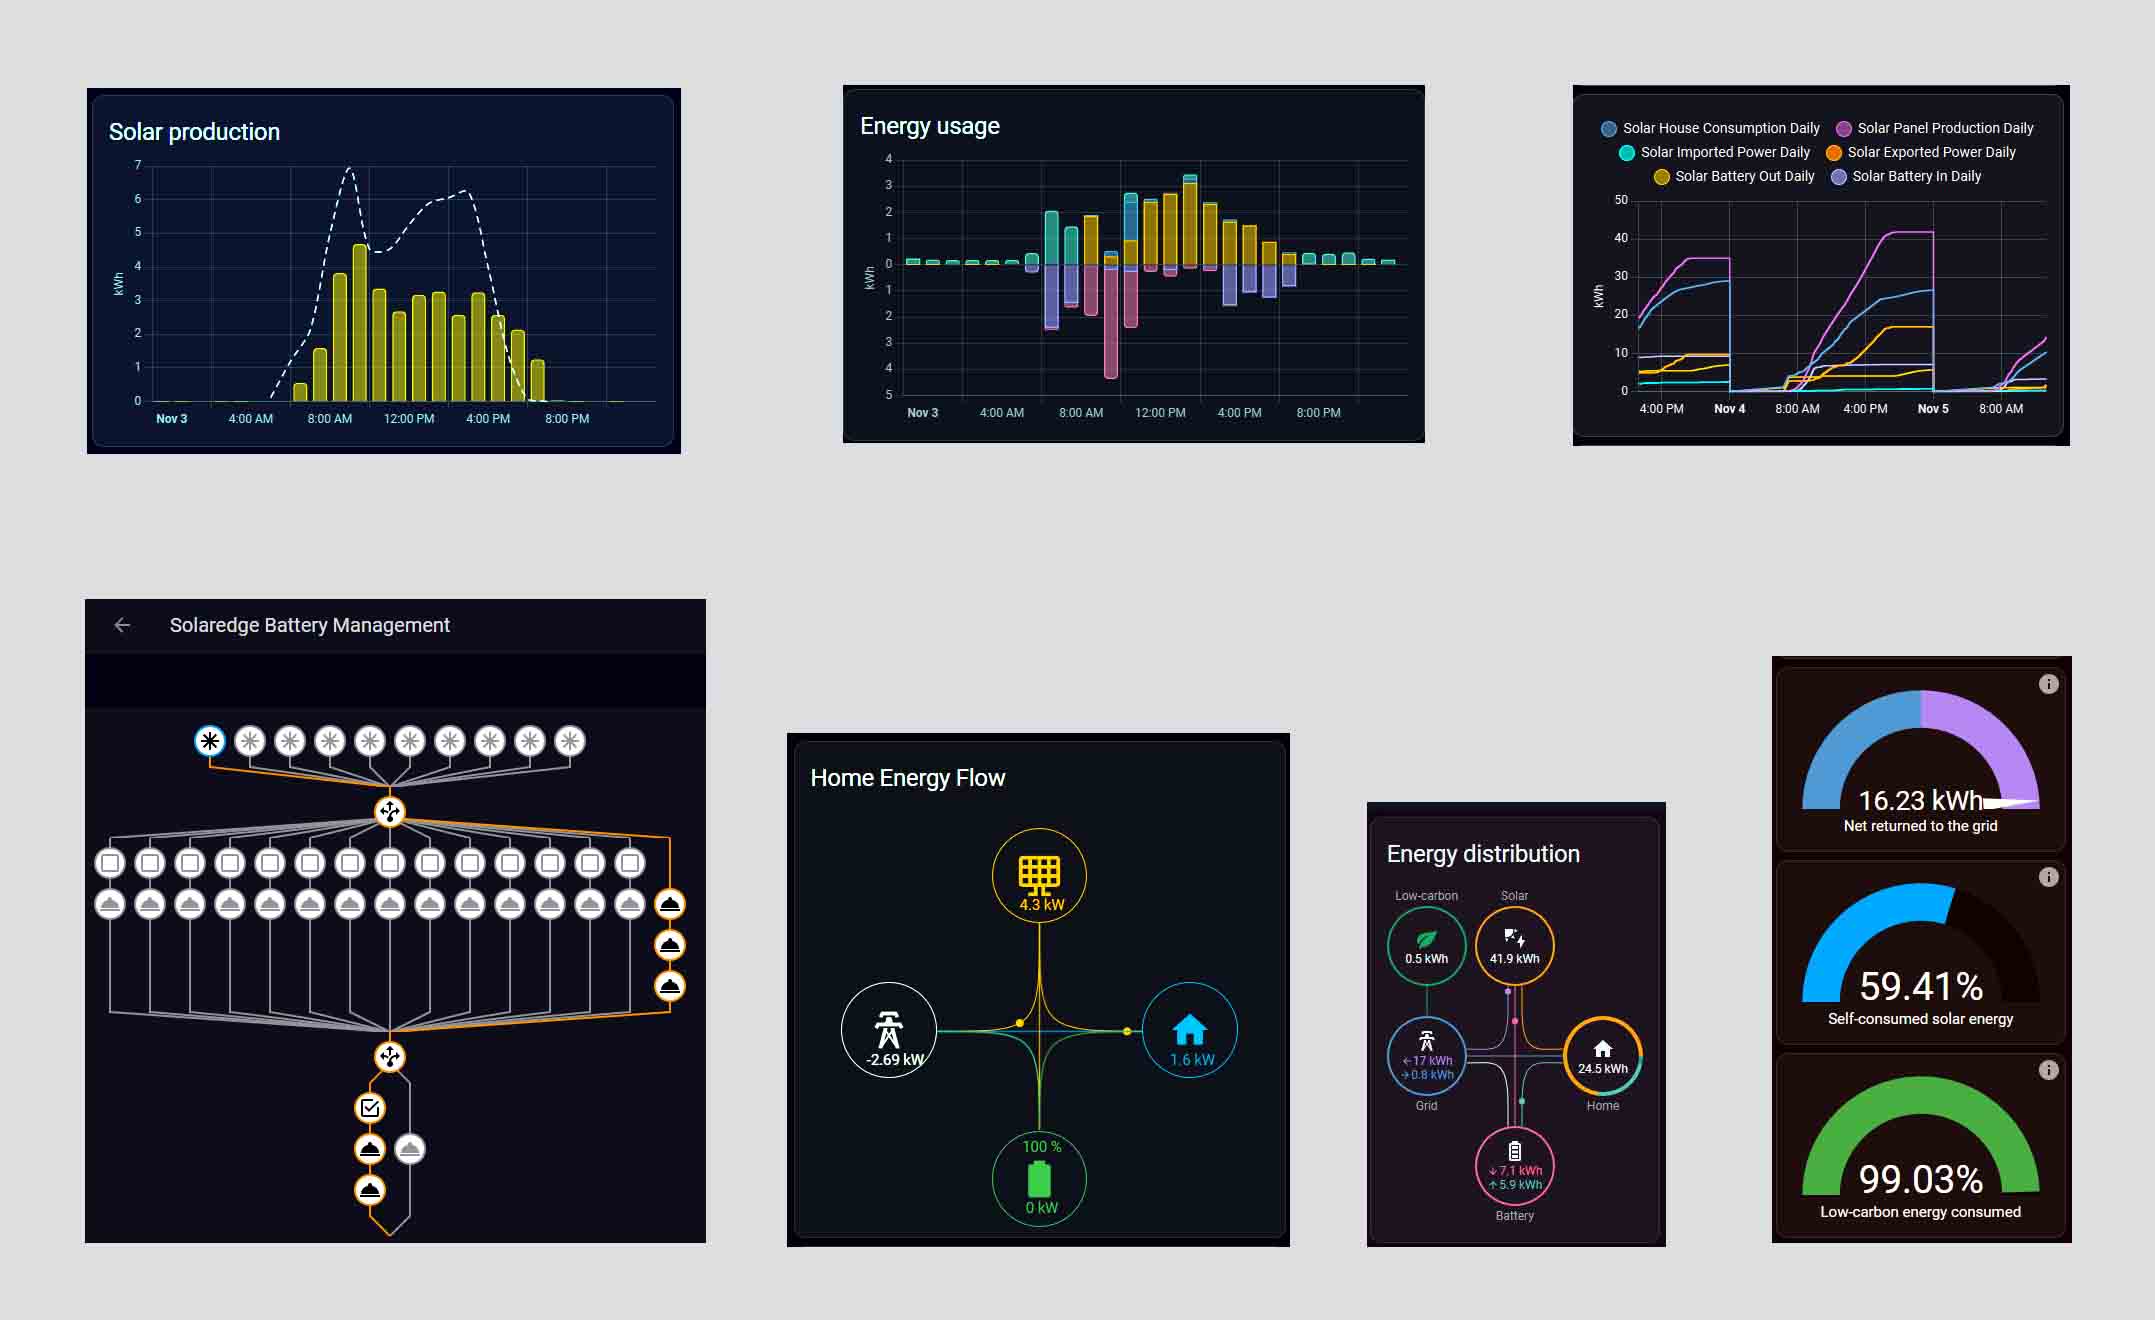
More of Mathias’ custom Home Assistant dashboards, just because they’re so awesome. Image: Mathias Boer-Mah
Footnotes
- In the app, if you click on inverter communication or inverter status, it will get you to scan the code on the side of the inverter, and that will let you into SetApp, which is what the installers use. So it’s not locked. You just have to know what you’re doing. ↩
Original Source: https://www.solarquotes.com.au/blog/solaredge-home-assistant-hack/
Related Posts:
 SolarEdge releases DC-optimized home solar, storage…
- SolarEdge announces its residential battery is now…
- SolarEdge Home Battery joins Rocky Mountain Power…
- Tom’s Solar, Battery And EV Tech Struggle – Can You Help?
- Sunnova dealers now offering the SolarEdge Home Battery
- LG ESS launches Home 8 residential battery
- Beating Blackouts: 4 Levels Of Home Battery Backup
- SolarEdge opens 2-GWh battery cell manufacturing…


