How To Set Up Sungrow iSolarCloud Monitoring For Useful Alerts
Rooftop solar and battery owners often use monitoring apps to track energy, yet many neglect the apps’ full capabilities. Beyond mere tracking, these apps can be crucial for setting up fault alarms and alerts.
This article will explore the benefits of getting the heads up when things aren’t going to plan with your solar production or battery storage, and what you can do about it. We’ll walk you through configuring iSolarCloud to receive useful alarms from a Sungrow inverter and Sungrow battery. Other popular inverter manufacturers have apps with similar functionality.
Why A Proactive Approach Is Best For Monitoring Solar
If you have the monitoring capability, why not use it proactively? “Out of sight, out of mind” doesn’t fly when it comes to investing in rooftop solar systems. Here are a few reasons why:
- Early Detection of Issues: Fault alarms provide early detection of potential issues. By promptly receiving notifications, action can be taken before a minor issue grows into a more significant one.
- Maximizing Energy Production: Identification and resolution of faults ensure that the solar system operates at its peak efficiency, leading to increased energy production, and saving you money.
- Avoiding System Downtime: A fault that you’re not aware of can result in periods of lost energy production, leading to reliance on grid power and loss of savings. With fault notifications, users can minimize downtime.
- Preventing Safety Hazards: Some faults may pose safety hazards, such as electrical issues or overheating components. Fault alarms enable homeowners to act quickly to address any safety concerns.
- Simplify Maintenance and Assist Technicians: Fault notifications make maintenance easier by pinpointing specific issues which can be forwarded to technicians or customer service.
What Kind Of Alarms Are You Likely To Receive?
Solar inverter and battery systems are complex electronic devices that can encounter various issues over time. The specific alarms and notifications may vary depending on the monitoring platform and the capabilities of the solar/battery system.
Some common types of alarms and alerts that a solar owner might receive are:
- Performance alerts
- System component faults
- Battery status
- Faulty wiring and connectivity
- On/off-line status
- Grid failure
- Environmental/weather factors
- Communication errors
- Firmware updates
Action To Take if You Receive An Alert
The first step is to read the alert carefully and understand the nature of the problem. If the notification indicates a safety concern, such as an electrical issue or overheating, it’s essential to prioritize safety.
Next, log in to the monitoring app or portal to gather more information about the alert. The monitoring system may provide additional details or troubleshooting suggestions to help diagnose the problem.
For solar owners without technical experience, contact your solar installer or customer service, and pass on any details that you have gathered. Whatever you do, DON’T attempt DIY repairs! It could worsen the problem and void your warranty.
Setting Up a Fault Contingency Plan Using Sungrow iSolarCloud
The following are steps to take to configure a Sungrow iSolarCloud (desktop view) fault contingency plan and receive alerts. As previously mentioned – other popular inverter manufacturers have apps with similar functionality. Refer to their respective documentation for configuration advice.
- Login to iSolarCloud: Begin by logging in to your iSolarCloud account using your credentials.
- Access ‘Advanced’ Settings: On the dashboard, locate and click on the ‘Advanced’ option from the left-hand menu.
- Click on ‘Alarm Subscribe’: Under the Advanced settings, select ‘Alarm Subscribe’ to configure your alarms.
- Create a New Alarm Plan: Click on the ‘+ Add’ tab in the top right corner to create a new alarm plan.
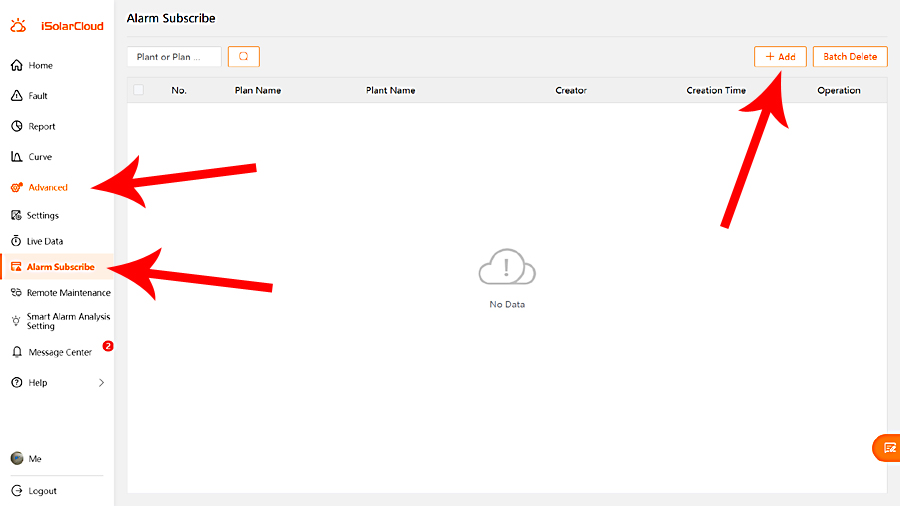
iSolarCloud ‘Alarm Subscribe’ page. Red arrows indicate navigation tabs to click on.
- Provide a Plan Name: Assign a unique name to your alarm plan for easy identification.
- Select the Solar Plant: Add your existing solar plant (e.g., Joe Bloggs PV) to the alarm plan.
- Set Fault Notifications: Under ‘Residential and String Inverters,’ select ‘Fault’ and then click ‘Select All’ to ensure you receive notifications for all faults, or pick individual fault notifications.
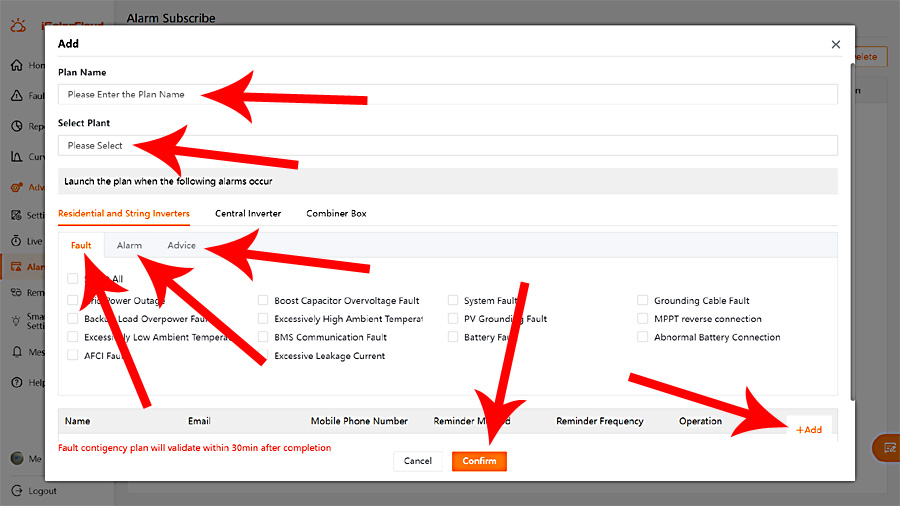
iSolarCloud ‘Fault Contingency Plan’ dialogue box. Red arrows indicate fields to fill in and navigation tabs to click on.
- Add Contact Details: Click on ‘+ Add’ at the bottom right corner, then select ‘Custom.’ Enter the contact details (email and/or phone number) of the person who should be notified in case of a fault.
- Confirm Settings: Click ‘Confirm’ to save the alarm settings.
- Configure Alarms for ‘Alarm’ and ‘Advice’: Repeat steps done in ‘Fault’ above to the ‘Alarm’ and ‘Advice’ sections to ensure comprehensive monitoring.
- Final Confirmation: After setting up all alarms, click ‘Confirm.’ The fault contingency plan will validate within 30 minutes.
- Carry On With Your Life: Now, all that’s left to do is wait nervously and hope that you’re never contacted with a fault alert.
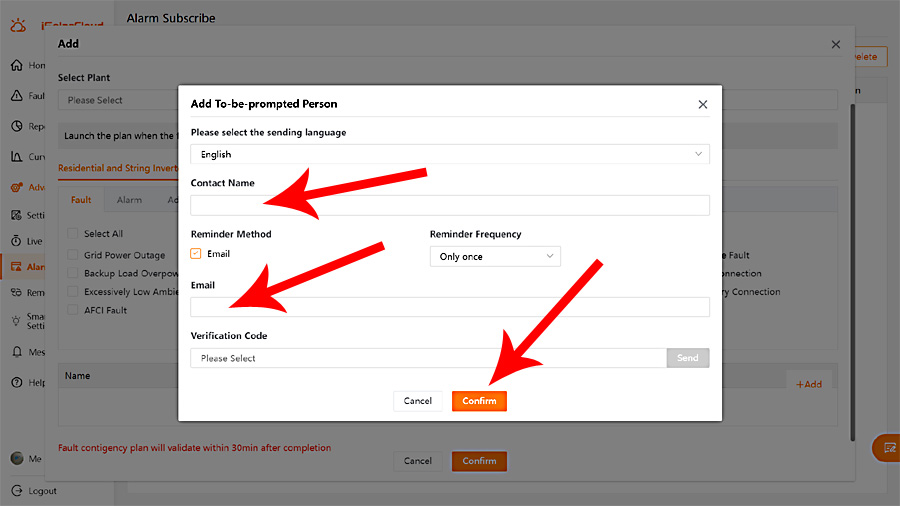
iSolarCloud ‘Prompted Person’ dialogue box. Red arrows indicate fields to fill in and navigation tabs to click on.
Checking Active Faults and Fault History with iSolarCloud
In the event that you have an alert notification, and wish to investigate further, these are the steps to take for accessing more information or troubleshooting:
- Log in to iSolarCloud: Access your iSolarCloud account using your login details.
- Navigate to the ‘Overview’ Page: Click on your solar plant name (e.g., Joe Bloggs PV) to access the ‘Overview’ page.
- Access ‘Fault’ Section: From the inner left-hand menu, select ‘Fault’ to view active faults.
- Check For Fault: If there are no faults listed, congratulations, your solar system is running smoothly! If you have a fault, read on.
- Check Fault History: To view past fault occurrences, go to the top menu and click on ‘Fault History.’ A list of previous faults will appear.
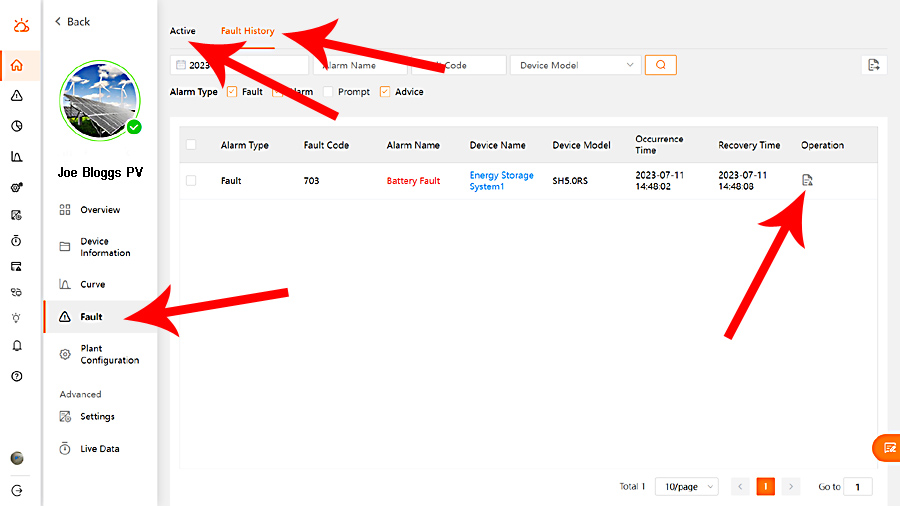
iSolarCloud ‘Fault’ page. Red arrows indicate navigation tabs to click on.
- View Fault Details: Click on ‘Operation’ for the fault you wish to investigate further. A dialogue box with ‘Fault Information’ and ‘Repair Advice’ will provide insights into the issue.
- Further Diagnostics: The technician can click on the ‘export’ tab on the right-hand side to export further data in the form of Excel and/or CSV files if necessary.
- Take Appropriate Action: In the case of an active fault, the ‘Fault Information’ will provide clear processing recommendations. Reiterating the previously mentioned; for solar owners without technical experience, contact your solar installer or customer service. Whatever you do, DON’T attempt DIY repairs! It could worsen the problem and void your warranty.
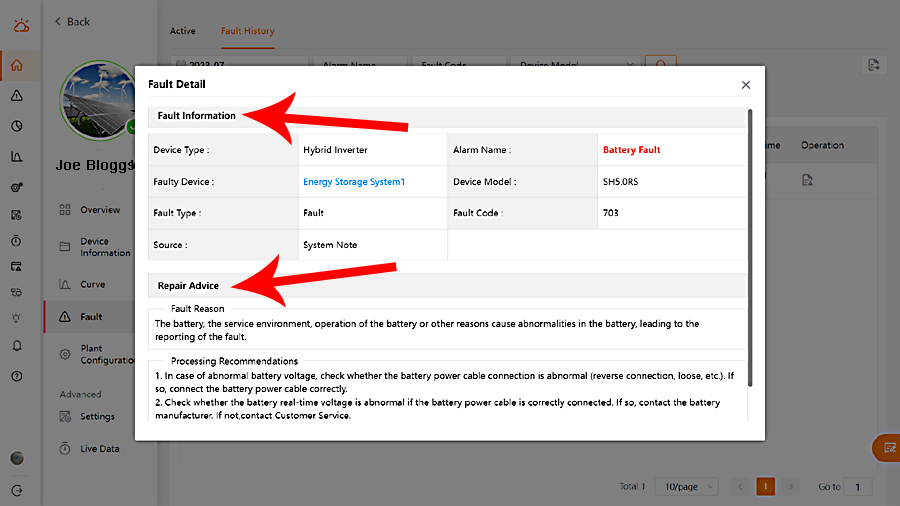
iSolarCloud ‘Fault Detail’ dialogue page. Red arrows indicate fault information and repair advice.
Wrapping Up: Leveraging Solar Monitoring Apps to the Fullest
Setting up fault alarms for your solar inverter and battery systems is a proactive approach to ensure smooth energy production and safeguard your investment. Using a solar monitoring app to its full potential has multiple benefits, not least of all – saving you money. By using the Sungrow iSolarCloud platform as an example, we’ve demonstrated how easy it is to configure fault alarms and monitor your solar system’s health.
Let us know in the comments how you set up alerts on your solar and/or battery system.
Original Source: https://www.solarquotes.com.au/blog/isolarcloud-useful-alerts/


